
Invite someone to a project
Invite a partner, designer, contractor or client onto a customer's project so they can see it on your website and, as an editor, change it.
Invite named people onto a customer’s project, each with a role. Everyone on the project sees the same items and prices. Typical uses are a couple shopping together, a designer sharing a selection with a client, or a homeowner sharing it with their contractor.
Before you start
- Your website needs to be live. Until it is, Invite is grayed out, and pointing at it says invites can’t be sent yet.
Steps
-
In the sidebar, select Projects & Lists.
-
Select the customer’s list.
-
Under the list details, select Invite.
-
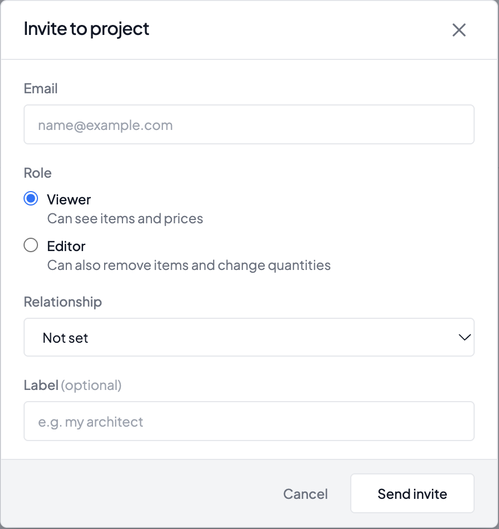
In Email, type the person’s email address.
-
Under Role, choose Viewer or Editor.
-
Optionally, in Relationship, choose how they relate to the customer.
-
Optionally, add a Label, such as “my architect”.
-
Select Send invite.
Good to know
Roles
- Viewer is the default. A viewer can see the project’s items and prices on your website.
- Editor can also remove items and change quantities and rooms.
- Only your team can invite people, change roles or revoke access.
Relationships
Choose Spouse or partner, Designer, Contractor, Client or Other. The person you invite sees the relationship and label before they accept, and can change or clear them, so write them as you would say them to the customer.
What the person you invite does
-
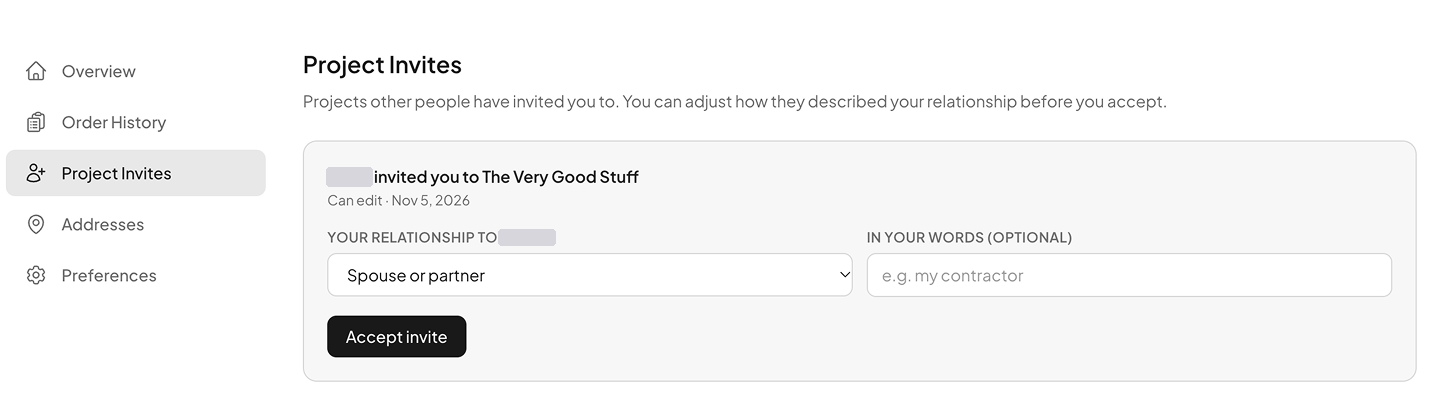
They get one email with a View invitation button.
-
The button opens the invites page on your website, where they sign in, or create an account, with the email address that was invited.
-
They can change or clear the relationship you picked, then accept.
-
In Neural Core, they now show as Accepted.
-
On your website, they select View your projects. The project appears under Shared with you, with who shared it and Can edit or View only.
Track who’s on the project
- The list details show a Shared with line naming each person you invited, by relationship or name, with “(invited)” after anyone who hasn’t accepted yet.
- The Shared with tab lists the customer first, then each person you invited with their relationship, a Viewer or Editor label and a Pending, Accepted or Revoked status.
- On the Projects & Lists page, the ⋯ menu on a row has Shared with, which opens the list on its Shared with tab.
Change or remove access
- In the Shared with tab, open the person’s ⋯ menu and select Change role or Revoke.
- For someone you revoked, select Invite again to send a new invite.
- If you invite someone who’s already on the project, you’ll see “Already on this project”.
Limits
- Each invite sends one email, and so does each Invite again. There are no reminders.
- Pending invites don’t expire.
- Editors can change quantities and rooms and remove items, but can’t add new products to a shared project yet. Viewers can look but not change anything.
- Anyone you invite can add the project’s items to their own cart with Add all to cart. It uses today’s prices on your website and doesn’t change the project.
- The people you invite can’t see or add comments. Comments aren’t on your website yet.
With a customer looking at the screen
While Privacy mode is on, the Details, Shared with and History tabs, the Shared with line, Invite, delete controls and customer emails are hidden. Items and Comments stay.
Who can invite
Anyone on your team who can open the list can invite people to it. If your account limits Staff and Marketing users to their own lists, they can invite only on their own and unassigned lists.